For any typos or questions visit the official PDF in Google Drive. Follow link below and open Apex Sketching Software Installation.pdf
https://drive.google.com/drive/folders/18v6ehp6q8hqDg468hIXjeMCXkNSyJNYU?lfhs=2
Apex Sketching Software Installation Rev. 8/25/2016
1) Login as the user & run G:\Install\Openapps\ApexSketchPro6 [latest version; check their website] taking the defaults and selecting the Add on to the desktop check box. (Be sure to install EQ Assessing before installing Apex.)
2) Click on the Apex Medina icon to start the program and when prompted with a message like Area Code Not Found, click on “Yes”. Next, a screen to register the application is displayed. NOTE: There are 6 licenses which are currently assigned to Karen Somerville, Nancy McLaughlin, Heidi Shevokas, Staci Holbrook, Lura Priebe and Laurie Taylor, and this can change according to whoever needs to use the application.
In order to register Apex (whether it’s for a user whose PC is being replaced, or a currently unregistered user), open a browser window (leaving the registration screen open) and go to
https://www.apexwin.com/registration/index.php.
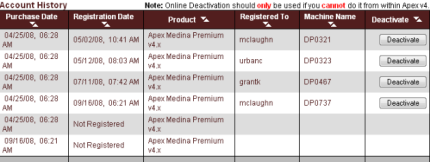
a. Login in with Bill’s email ID as follows, and on the next screen select “View License History”: photo


NOTE: Although a user/PC doesn’t show up in the Registered To / Machine Name list, there is a “bug” in the current version that sometimes allows full use of the application (not just in demo mode) for an unregistered user/PC.

Apex Sketching Software Installation Rev. 3/16/2016
b. If the user shows as a registered user in the list, you’ll need to deactivate their current license in order to register the new installation of Apex. Click the Deactivate button next to the user’s name.
c. Go back to the registration dialog box that opened when Apex the application was initially opened in step 2 earlier.
sauerb@rochester hills.org

photo
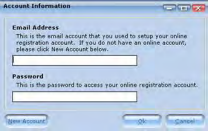
d. Click Register Now and on the screen that follows sign in with Bill’s email ID and password “photo”. Click Ok and a message should then be displayed indicating the registration was successful.
e. Close the Apex application..
NOTE: If an error message indicates that “gdiplus.dl”’ can’t be found, copy it from
G:\Install\Openapps\ApexWin\ and paste it into C:\Program Files\Apex Software\Apex Medina Premium.
3) The following steps are accomplished using batch files created by Kevin and saved in the Assessing I: drive (Ass\APEX\BatchFilesToUpdateWorkstationsKAREN)and Karen Somerville's H: drive
a. Open Windows Explorer and delete all subfolders under C:\Program Files\Apex Software\Apex Medina Premium\Symbols\Favorites, and replace them with all the files located in
\\colpotter\data\Department\D_Ass\Ass\Apex Software\Symbols\Favorites.
b. Copy the following 2 files from \\colpotter\data\Department\D_Ass\Ass\Apex Software: v41A4WPremiumConfig.XML, v41A4WPremiumText.XML and paste them into
On Windows XP PCs:
C:\Documents and Settings\<profile name>\My Documents\Apex Software
On Windows 7 PCs
C:\Users\<profile name>\My Documents\Apex Software\
c. Copy the file AXWDDA1.DAT and paste it into
On both Windows XP & Windows 7 PCs:
C:\Program Files\Apex Software\Apex Medina Premium
Was this article helpful?
That’s Great!
Thank you for your feedback
Sorry! We couldn't be helpful
Thank you for your feedback
Feedback sent
We appreciate your effort and will try to fix the article