Setting Up A Notebook PC For Use With The AutoVu Meter Reading Application Rev.10/15/2015
Notes On The Notebook PC Used For Radio Reads Of Water /Sewer Meters
It is not in the RH.GOV domain and rarely gets connected to the network (only to get Microsoft updates).
Has a local user account “meterread” which is a member of the PC’s local Administrators group.
Has only the AutoVu application installed (no antivirus, Microsoft Office, or Adobe Reader, or anything else).
Is currently running AutoVu version 3.06 (as of 10/15/2015 on DP1300)
1) Installing AutoVu is pretty straight-forward as there aren’t any options to set during installation. Run AutoVu306b5.exe
from G:\Install\mistools\Sensus AutoVu-AutoRead\AutoVu Map Files (the activation serial number and
password noted below as well as a printed copy in a folder labeled “Meter Read – AutoVu” under “M”).
2) After the installation has finished it asks if you want to “Serialize?” (activate) the application. Select Yes, and a
screen is displayed (sorry, no screenshot available) that asks for the following information to be entered:
“Serial number” (it’s usually 30647)
Click to the left of “Mapping Available” and “GPS Tracking Available” to select & activate these options.
Enter the “Application password” (for version 3.06, case-sensitive: 4YQ8-0SXQ-7JCY-306-U (the 0s are zeros)
NOTE: If you run into any issues installing, or have questions pertaining to AutoVu contact Sensus Tech Support at
800-638-3748, options 2 and then 1 or via email at support@sensus.com.
3) There are a set of map files used by AutoVu that are specific to our geographic area. These files need to be copied to
the AutoVu directory on the PC. There are 3 directories (“Maps”, “MapInfo”, and “Mapping”) located in:
G:\Install\mistools\Sensus AutoVu-AutoRead\AutoVu Map Files. Copy them to: C:\AutoVu, overwriting the existing
directories.
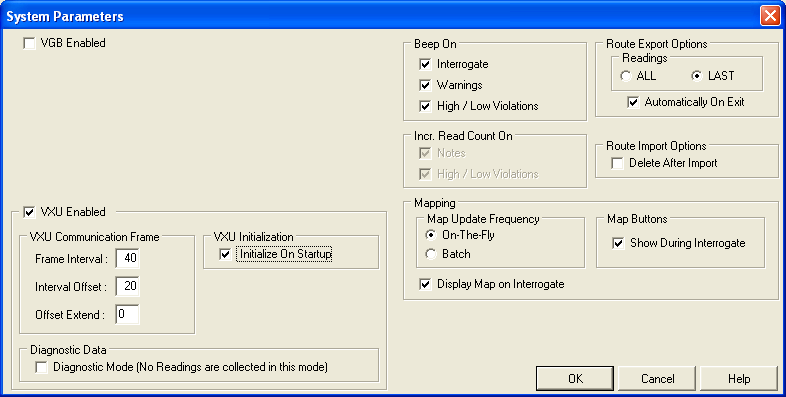
4) After installing AutoVu and copying over the map files, there are additional settings that need to be changed as shown
below. Open AutoVu (when initially opened it may display a message about registering map extensions, and after
clicking OK a message will be displayed indicating the registration was successful). Click View / System Parameters,
and change the settings to match those shown here:
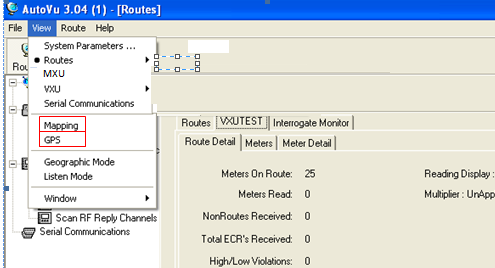
5) Click View and select Mapping and GPS (which adds these components to the menus on the left side of the screen):
6) Select Mapping on the left, and then right-click in the map area and select Layer Control:
7) Click “Add”, selecting each of the files shown below one at a time, and click Open until the Layers list contains all 8 maps (VXU001Meter is a test map that automatically appears in the list). Click Done when all maps have been added.
8) The COM port settings for the GPS, and VXU units need to be configured in AutoVu so the application can
communicate with the hardware. At this point you’ll need access to the meter reads vehicle so the hardware can be
connected to the PC, and the COM port settings configured.
In the vehicle: Before powering any equipment on, plug the GPS into one of the PC’s USB ports. Next, connect the
VXU’s serial cable to the PC’s COM port, or to a serial-to-USB adapter. Plug the other end of the serial/USB adapter
cable into the PC. Turn on power to the VXU, and then start up the PC. Login with the local user account
“meterread”, and password “meters”.
Have the GPS drivers CD ready (it’s in the folder with the AutoVu CD) and when prompted for a driver when Windows
starts, install it from the CD. Open the PC’s Device Manager and expand “Ports”. The GPS should show up as “Prolific
Serial-to-USB (COM#)”. The VXU should also show in the Ports list. Make a note of the COM port
numbers for both the GPS & VXU. NOTE: The screenshot only shows the GPS since I didn’t have access
to the VXU while writing this, but when the VXU is plugged into the PC’s serial port it’s usually assigned
to COM1.
9 ) Open AutoVu. In the left side pane click “Serial Communications” to view and/or set the COM ports for the VXU
and GPS, so that they match the settings in Device Manager. Click the VXU or GPS tab to view the settings, and
change them if necessary, to the settings shown in Device Manager:
10) Have Dawn (or whoever is the current meter technician test that the VXU, GPS, and PC are communicating in AutoVu by retrieving the “VXUTEST” route.
NOTE: When exiting AutoVu, click “Cancel” when the “Export” dialog box is displayed.
Was this article helpful?
That’s Great!
Thank you for your feedback
Sorry! We couldn't be helpful
Thank you for your feedback
Feedback sent
We appreciate your effort and will try to fix the article