
MIS Department Policy & Procedure
Computer Setup
Pre-login (first startup):
If this is a replacement PC, check in Spiceworks, GLPI, or PDQ Inventory to see if the old PC has any GIS desktop components installed. If so, make sure to contact the GIS team ASAP to schedule a GIS review with the employee.
Also use Spiceworks, GLPI, or PDQ Inventory to check which apps the old computer currently has installed. If they have anything other than a base installation, add them to the appropriate groups in Active Directory:
Note that this can be completed later if this is a new build and you don’t know what software is needed.
If doing this post-deployment, add the computer to the correct PDQ Deploy groups in Active Directory and then run “Deploy Software to Preexisting Computer” in PDQ Deploy. (You can also run each software separately if you want to. I cannot guarantee that this will work at this time. sao)

Connect the ethernet to computer, On how would you like to setup this device, select “Setup for work and School”, Other options, and Domain Join.
When starting the system, decline any diagnostic/tracking/survey/location, etc. options
When asked for computer name, use the next DP# available in GLPI. Use a sticker on Sarah’s desk to identify it.. When asked for a local username, use “mis”. Password can be anything, since it will be changed by LAPS policy when joined to the domain.
For security questions, use the questions/answers provided for mis in Dashlane
Check the Outlier Computer List to see if the computer you are replacing has any special policies that may or may not apply to it.
After logging in as mis:
Add computer to rh.gov domain using the DP tag number; don’t reboot computer yet. [Right click This PC - Properties - Advances System Settings]
Remote desktop into Beans or Corn, and run powershell as an administrator.
Run the following script and follow the prompts: \\colpotter\scripts$\AddComputerRHGroups\AddComputerRHGroups.ps1
The computer should now be added to the appropriate groups. Reboot the machine.
After the machine restarts, log in using your domain admin account:
Run “gpupdate /force” from the command prompt and reboot the computer.
Log into the machine upon reboot and run Windows Update. Let the computer finish Windows Update and reboot.
Uninstall all Microsoft 365 and OneDrive versions manually.
Driver updates
Open Services as administrator
Locate the Dell Client Management Service
Right click and select properties
In the startup type drag down, select automatic or manual
Underneath service status start the service
Next, open the “Dell Command | Update application and Check for updates
Install any necessary updates
Once completed, return to services.
Locate the Dell Client Management Service, right click stop the service
Go back into the properties - startup type and turn off automatic to manual or disabled


PDQ Steps
RDP into Spicy using your admin account and open PDQ Deploy and PDQ Inventory.
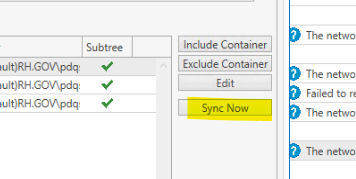
In PDQ Inventory, make sure that an active directory sync has occurred prior to deployment (this ensures that the computer receives its custom software)
Go to Options -> Preferences
Select Active Directory and check the Last Sync Time:

If PDQ Inventory hasn’t synced since your updates to Active Directory, click “Sync Now”:
Run the “Deploy Computer” package using the “Deploy Once” option.
Monitor the Deployment to make sure that none of the steps fail. If a step fails, reboot the computer and then right-click on the failed deployment and select “Redeploy from Failed Step”. Repeat this process until all steps have completed successfully. (If ConnectWise fails, check to see if it has already been installed. If so, skip the step and move on. Connectwise is automatically installed by PDQ.)
At the end of a successful deployment, the machine will reboot on its own.
Log in again and check to ensure that the appropriate software has been installed on the computer. If any software is missing (typically MS Office will sometimes error out), rerun the deployment and recheck the software.
Run Windows updates (rebooting when needed) repeatedly until no more updates are showing as needed.
Set up LogMeIn to license the computer.
Update GLPI with information.
User Setup
Coordinate with user and Network Admin to set temporary password to use during final setup.*
Sign in as user using temporary password*
*If you want to do this before giving the computer to the user, follow these steps. If not, you can just have them sign in and do these steps when you give them the computer.
Turn off Suggestions (Settings, Personalization, Start, Occasionally show suggestions in Start to Off)
Snipping tool settings: Set for Multiple Windows and Use the Print Screen Button
Unpin all unnecessary Tiles
Cleanup Start menu (unpin -- for now uninstall is only temporary - they come back with updates) Add in Word/Excel/Chrome/IE
Pin Word/Excel/Chrome/Edge to taskbar
Right-click notifications - Select “Don’t shop app icons” and “Don’t show number of new notifications”
Right-click taskbar - disable Cortana and task view buttons
File Explorer Options
Click “View” tab => Click Options (far right) => Click General => Open File Explorer to “This PC”
Click “View” tab => Click Options (far right) => Click View tab (again)
Make sure “Hide empty drives” and “Hide extensions for known file types” are unchecked
Expand “This PC” in the left column so networked drives show
Printers- Once the users logs in, make sure the correct printers they need are showing up for them. Printers should be there because they are included in the login script.
Install non-standard apps (check their old PC in GLPI)
ArcGIS – Installation guide procedures are in our shared drive.
Set Defaults by App (primarily Acrobat and Chrome, cuz Edge will mess with all of those)
Check changes made after updates, especially default apps and bloatware.
Disable weird MS Notifications - Open Settings -> Notifications & Actions and disable the following:
Show me the Windows welcome experience…
Suggest ways I can finish setting up…
Get tips, tricks, and suggestions as you use Windows
“Partner Promo” under “Get Notifications from these senders”
Modified 11/16/2023 by s. olson for Windows 11
Modified 2/11/2025 by s.olson

Was this article helpful?
That’s Great!
Thank you for your feedback
Sorry! We couldn't be helpful
Thank you for your feedback
Feedback sent
We appreciate your effort and will try to fix the article