
MIS Department Policy & Procedure
Description
This PDQ automation was provided by BSA and runs every month on days 2, 16 at 2:00 am.
PDQ Deploy Configuration
Installation
PDQ Deploy is licensed on a per user basis. Before installing, please make sure that you are logged into the server as the user that they would like to use for managing PDQ Deploy in the future. Trying to launch PDQ Deploy while logged in as another windows/domain user will not work.
Install PDQ Deploy from their website. Once you run it for the first time it will prompt you to use
Free Mode or Use License (Enterprise). Choose Use License (Enterprise).
**BS&A’s prebuilt package will not work with the free edition of PDQ Deploy
It will then ask you to enter the License. The customer should have an email with the license number or they can log into their PDQ Deploy account and get their license from there.
Paste the license into the field.
You will be prompted for the Enterprise Installation type. Choose Local.

It will ask for you to enter credentials. These credentials MUST be a user that is an administrator on the local server as well as the machines that the software will be deployed to.
Configuration
On the machine with PDQ Deploy installed on it; download the XML package to import.
Unzip the package to an accessible location.
Open PDQ Deploy and Choose File> Import and point to the unzipped XML file.
This will add a BS&A Customer Update Package to the left pane.
Choose Options at the top and click Variables
In the new window that is opened change the value of the @(BSAShare) to the customer’s BSA share location. It is important that there is a backslash at the end of the instance name. There is not a Save button. Just close the window.

Download BS&A .NET Update Files
This part of the package will download the installation files from BS&A’s website and place them in the
BSA Share on the server.
Double click on Download BS&A .NET Update Files to open up the package.
To the right of the window, near the top of the script, there is a path: \\ServerName\BSA
Change this to match the customer’s BSA share location (as you did in Configuration
Step 6).

Click on Save in the top left of the window, then exit the window.
Click on Download BS&A .NET Update Files to highlight it.
Click on the Schedules tab.
Click the New Schedule button at the top of PDQ Deploy
On the Triggers tab click the Monthly button
On the Day of Month choose the dates that you would like to have the install files
download from BS&A’s website. (We recommend doing it on the 2nd and 16th).
Choose what time this should take place on the dates chosen in step 4a.
On the Targets tab click Choose Targets > Active Directory and select the server where the BSA Share is located and move it to the right target field.
On the Options tab make sure ‘Stop Deploying to Targets once they succeed’ is UNCHECKED.
Choose OK to close the window.
Initial Install BS&A .NET Apps (all)
This part of the package should only be used to install BS&A applications on machines that are new or do not already have the BS&A applications loaded. This package should not be scheduled to run on a recurring basis.
Double click on the Initial Install BS&A .NET Apps package to open the edit window.
CTRL + Click on each of the steps with a yellow exclamation mark as well as the ‘wait’ step
immediately after.
Right click on a highlighted selection and uncheck Enabled to disable the steps.
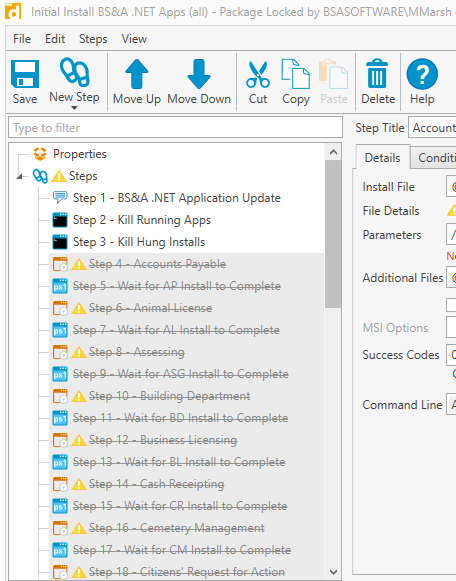
Click Save and close that window.
The yellow exclamation mark over the package should now be gone.
Update BS&A .NET Apps
This part of the package will update the workstations that have the BS&A applications already installed on them. It will not run on machines without the applications installed.
Double click on the Update BS&A .NET Apps package to open the edit window.
CTRL + Click on each of the steps with a yellow exclamation mark as well as the step immediately after those packages.
Right click on a highlighted selection and uncheck Enabled to disable the steps.
Click Save and close that window.
The yellow exclamation mark over the package should now be gone.
Click New Schedule at the top of the PDQ Deploy window.
On the Triggers tab click the Monthly button
On the Day of Month choose the dates that you would like to have the updates ran. (We recommend doing it on the 2nd and 16th).
Choose what time this should take place on the dates chosen in step 4a. This time should be at least an hour after the download package is started.
On the Targets tab click Link To > Active Directory Container
In most cases you can select the entire domain as the AD container to update all machines on the domain with BS&A applications installed. However, if the customer has an AD container that encompasses all machines with BS&A installed on them, you can choose that package.
On the Options tab make sure ‘Stop Deploying to Targets once they succeed’ is UNCHECKED.
Choose OK to close the window.
At this point PDQ Deploy is configured to run the updates.
Keep in mind the following items:
If you run the Download BS&A .NET Update Files package during business hours the customers will be prompted to update their applications the next time they close and re-open their applications.
If you run the Update BS&A .NET Apps package during business hours it will force close all apps on all machines with the BS&A apps installed and run the updates even if they are updated already.
At any point the Update BS&A .NET Apps package can be deployed on a specific machine as long as that user is not using the BS&A applications during that time.
Was this article helpful?
That’s Great!
Thank you for your feedback
Sorry! We couldn't be helpful
Thank you for your feedback
Feedback sent
We appreciate your effort and will try to fix the article